Hi Friends, if you like my blog please give your valuable comments it will help to improve my blog content and enthusiasm to write a lot in android World.

Thursday, February 7, 2013

Trick to get source code from APK file


Required software's and Tools

Get APK source code files for Windows
or
Get APK source code files for Mac OS X
or
Get APK source code files for Linux


Step 1. Rename the .apk file you wish to retrieve and change the extension to .zip. Then extract the file that it creates.
Step 2. Copy the contents of the dex2jar folder to the extracted folder to make it easier for yourself, and run:
dex2jar classes.dex
and copy the resulting “classes.dex.dex2jar.jar” into a new folder.
Step 3. Open up the Java Decompiler and drag “classes.dex.dex2jar.jar” into the window and then go to File > Save and save the source in a .zip file.
Step 4. Extract the saved .zip and copy the contents to a new folder somewhere. This will be where we keep your source code.
Step 5. Now, copy “framework-res.apk” and “yourapk.apk” to the APKTool folder. Then open a command prompt or Terminal window and type:
apktool if framework-res.apk
apktool d <yourapk.apk>
Step 6. Now just copy the contents of the resulting folder to the same place you copied the contents of “classes.dex.dex2jar.jar” earlier and voila, you have your source code. You may need to remove a couple of things as shown in the video, but your entire code should be there!

Import project into eclipse

Step By step

1. Navigate to Import section
2. Select ‘Existing Android project into workshop’ option under ‘Android’ section and click on ‘Next’
3. In the next screen browse and select the app folder, check the option ‘Copy project into workspace’.
4.App is imported successfully.

Hope this help you guys:)


Thursday, January 31, 2013

Android-Remote Debugging in chrome

You can debug mobile web sites with the full suite of Chrome Developer Tools running on a desktop browser that's connected to your phone via USB. View and change HTML code and styles until you get a bug-free page that behaves perfectly on the phone or tablet.

Know more: https://developers.google.com/chrome/mobile/docs/debugging 

Wednesday, January 2, 2013

Calling system settings from an Android app - GPS example


This tutorial shows how to redirect the user to a system settings screen asking to modify some settings the application depends on. We will make a specific example with Gps: The application can be used only if gps is available.
The android system gps setting screen can be called just like any other Activities:
  1. startActivityForResult(newIntent(android.provider.Settings.ACTION_LOCATION_SOURCE_SETTINGS), 0);
To check GPS availability use the code code below: (the Activity must implement LocationListener)
  1. LocationManager locationManager = (LocationManager)getSystemService(LOCATION_SERVICE);
  2. locationManager.requestLocationUpdates(LocationManager.GPS_PROVIDER, 1000L,1.0f, this);
  3. boolean isGPS = locationManager.isProviderEnabled(LocationManager.GPS_PROVIDER);
The example application will do the following:
1. On application start check if gps is available. If it is on the application can proceed.
2. If GPS is turned off, display a dialog asking the user to turn it on, and 2 buttons, one to go to GPS settings screen, and a cancel button to exit the application.
3. When the dialog is displayed we must store in a variable that the user was already asked once to turn on GPS
4. If the user leaves to the GPS option screen, it is not sure that he will turn on the GPS!
5. When the user returns to  application we recheck the GPS. If its available we can proceed, otherwise we close the application. (in order to check that it is a returm to the activity or is it its first start we check the variable we set in step 3)
So we will have the code in the applications starting Activity's on Resume method, where we will detect GPS availability, use a dialog to ask the user, an Intent to go to options screen, and a variable to indicate the state of the GPS turn on process. The code for this example application is available here. Turn off your GPS and try running it.

Friday, December 14, 2012

5 tips for converting iOS UI to Android


5 tips for converting iOS UI to Android

Making your app look like it belongs into an Android phone

Many companies are converting their iOS apps to Android nowadays. However, simple one-to-one conversion of the UI might cause problems to the potential users. 

I don't believe that inter-platform consistency between an app's different versions is as important than consistency between apps on a single platform. Not many users use multiple different phones at the same time. This post describes five simple rules how an iOS app can be made to fit into the growing Android app crowd.

1. Use top tabs
Google recommends that tabs in Android apps placed on top part of the UI instead of the very bottom.
a slide from Roman Nurik's GDD 2010 presentation


There's a very good reason for that recommendation. Take a look at the following pictures.Both of them features app called runtastic. Their Android port keeps the UI virtually unchanged and causes problems to big portion of Android users. Many Android phones have the 4 (or some 3) required Android buttons right on the screens bottom edge. Having your app's navigation immediately adjacent to the buttons will inevitably cause users to tap the navigation buttons from time to time.


Foursquare port does a good work moving the navigation tabs to higher and avoiding the same problems as runtastic has.

On the left: iOS version. On the right: Android version.


2. No back button in UI

All Android devices are required to have a back button and user's have used in using it. There's no need to add a back button to the UI. 
Don't do this:
A bit embarrassingly this example is
 from Android Central (an awesome source
for Android news) app. 

3. Use Android platform icons

Android platform provides icons for most common actions. One of them is share. Allrecepies uses an iOS icon (top right corner). There's a well established "share" icon for Android seen for example in the default gallery app. It is freely available to use in every app.

On the left: Wrong. On the right: Correct.


4. Use Android's intent APIs

One of the most powerful features of Android platform is the intent API. It allows apps to extend other apps' functionality by offering access to their features. Probably the most common way of doing this is the share function on various apps. An app can chose to share text, URL, image etc. Other apps can then register to listen to intents that they can handle. 

Apps should not implement their own interface for sharing through Facebook, twitter etc. If the app just let's the Android handle the share intent user can use their twitter etc app of choice. This way is much more convenient to users.

On the left: Wrong. On the right: Correct.


5. Consider using Action Bar

Action bar has become a single most easily identifiable feature in Android apps. Using it will instantly brand the app as an Android app. Users are used to the concept and it can improve app's usability. However, as always UI components should only be used if it makes sense.

Evernote uses Action Bar
pattern successfully

Conclusion

Simple one-to-one conversion from iOS design is usually not enough to create good user experience. However, the changed required might not require too huge amount of effort and will be rewarded by much better user satisfaction. 

Tuesday, December 4, 2012


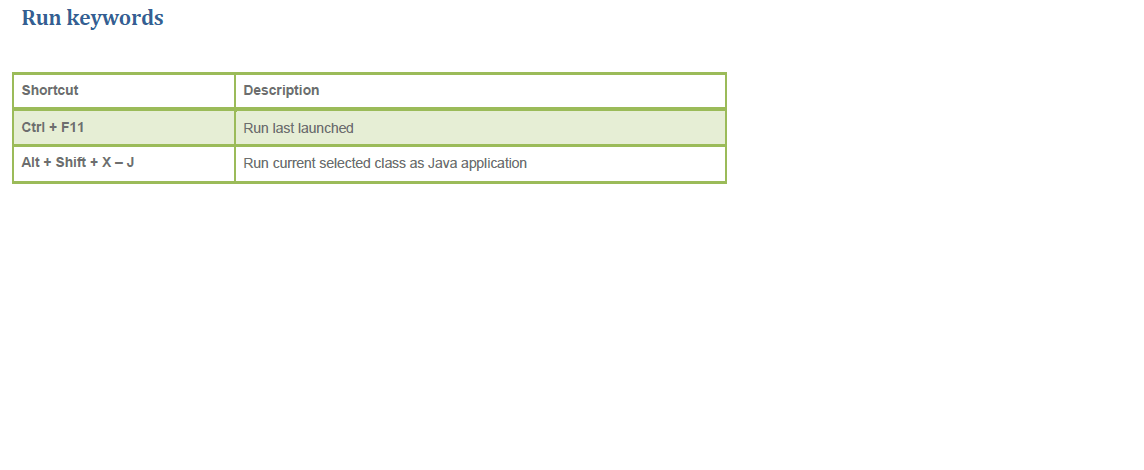
         Eclipse shortcuts for Android Developers


         Editing shortcuts


Thursday, November 29, 2012

Get list of currently installed apps

List out all of the user's installed applications in an activity. 
public void onCreate(Bundle savedInstanceState)
{
 super.onCreate(savedInstanceState);
 setContentView(R.layout.main);
 lView = (ListView) findViewById(R.id.list1);
 PackageManager pm = this.getPackageManager();
 Intent intent = new Intent(Intent.ACTION_MAIN, null); intent.addCategory(Intent.CATEGORY_LAUNCHER);
 List list = pm.queryIntentActivities(intent, PackageManager.PERMISSION_GRANTED);
 for (ResolveInfo rInfo : list) {
 results.add(rInfo.activityInfo.applicationInfo.loadLabel(pm).toString());
 Log.w("Installed Applications", rInfo.activityInfo.applicationInfo.loadLabel(pm).toString());
 }
 lView.setAdapter(new ArrayAdapter(this, android.R.layout.simple_ list_item_1, results));
}

Wednesday, November 21, 2012

check internet is available?

This function will return true if you can access the internet (or false if you can't). You can change the parameter being return when roaming 


/*
* @return boolean return true if the application can access the internet
*/
private boolean haveInternet(){
NetworkInfo info = ((ConnectivityManager)getSystemService(Context.CONNECTIVITY_SERVICE)).getActiveNetworkInfo();
if (info==null || !info.isConnected()) {
return false;
}
if (info.isRoaming()) {
// here is the roaming option you can change it if you want to disable internet while roaming, just return false
return true;
}
return true;
}