Hai friends My name is arunkumar and I'm working as an android developer.I'm gonna blog my journey through android world right here...I hope it will be helpful for anyone who's in the same journey...and i also want you to help me to improve the quality of this blog if you are an experienced Android developer...
Friday, August 24, 2012
Conversion to Dalvik format failed with error 1" Error in ANDROID / Eclipse.
This is a normal error when you import some project into eclipse.
I will show you how to solve this
First try cleaning the project from project->Clean.
If this didn’t work, then try these
Follow these steps
1. Go to Project » Properties » Java Build Path » Libraries and remove all except the “Android X.Y” (eg: Android 1.5). click OK.
2. Go to Project » Clean » Clean projects selected below » select your project and click OK.
Now your error may be gone.
Happy coding…
Friday, August 17, 2012
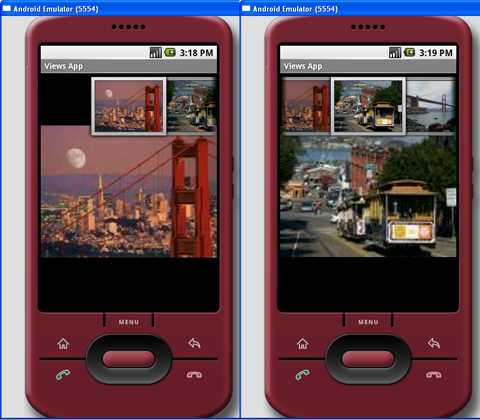
ImageSwitcher View in android
<?xml version="1.0" encoding="utf-8"?>
<RelativeLayout xmlns:android="http://schemas.android.com/apk/res/android"
android:orientation="vertical"
android:layout_width="fill_parent"
android:layout_height="fill_parent"
android:background="#ff000000"
>
<ImageSwitcher
android:id="@+id/switcher1"
android:layout_width="fill_parent"
android:layout_height="fill_parent"
android:layout_alignParentLeft="true"
android:layout_alignParentRight="true"
android:layout_alignParentBottom="true"
/>
<Gallery
android:id="@+id/gallery1"
android:layout_width="fill_parent"
android:layout_height="wrap_content"
/>
</RelativeLayout>
Modify the DisplayViewsExample.java file as shown below:
package net.learn2develop.AndroidViews;
import android.app.Activity;
import android.content.Context;
import android.content.res.TypedArray;
import android.os.Bundle;
import android.view.View;
import android.view.ViewGroup;
import android.view.animation.AnimationUtils;
import android.widget.AdapterView;
import android.widget.BaseAdapter;
import android.widget.Gallery;
import android.widget.Gallery.LayoutParams;
import android.widget.ViewSwitcher.ViewFactory;
import android.widget.ImageSwitcher;
import android.widget.ImageView;
import android.widget.AdapterView.OnItemClickListener;
public class DisplayViewsExample extends Activity
implements ViewFactory
{
//---the images to display---
Integer[] imageIDs = {
R.drawable.pic1,
R.drawable.pic2,
R.drawable.pic3,
R.drawable.pic4,
R.drawable.pic5,
R.drawable.pic6,
R.drawable.pic7
};
private ImageSwitcher imageSwitcher;
@Override
public void onCreate(Bundle savedInstanceState)
{
super.onCreate(savedInstanceState);
setContentView(R.layout.displayview);
imageSwitcher = (ImageSwitcher) findViewById(R.id.switcher1);
imageSwitcher.setFactory(this);
imageSwitcher.setInAnimation(AnimationUtils.loadAnimation(this,
android.R.anim.fade_in));
imageSwitcher.setOutAnimation(AnimationUtils.loadAnimation(this,
android.R.anim.fade_out));
Gallery gallery = (Gallery) findViewById(R.id.gallery1);
gallery.setAdapter(new ImageAdapter(this));
gallery.setOnItemClickListener(new OnItemClickListener()
{
public void onItemClick(AdapterView parent,
View v, int position, long id)
{
imageSwitcher.setImageResource(imageIDs[position]);
}
});
}
public View makeView()
{
ImageView imageView = new ImageView(this);
imageView.setBackgroundColor(0xFF000000);
imageView.setScaleType(ImageView.ScaleType.FIT_CENTER);
imageView.setLayoutParams(new
ImageSwitcher.LayoutParams(
LayoutParams.FILL_PARENT,
LayoutParams.FILL_PARENT));
return imageView;
}
public class ImageAdapter extends BaseAdapter
{
private Context context;
private int itemBackground;
public ImageAdapter(Context c)
{
context = c;
//---setting the style---
TypedArray a = obtainStyledAttributes(R.styleable.Gallery1);
itemBackground = a.getResourceId(
R.styleable.Gallery1_android_galleryItemBackground, 0);
a.recycle();
}
//---returns the number of images---
public int getCount()
{
return imageIDs.length;
}
//---returns the ID of an item---
public Object getItem(int position)
{
return position;
}
public long getItemId(int position)
{
return position;
}
//---returns an ImageView view---
public View getView(int position, View convertView, ViewGroup parent)
{
ImageView imageView = new ImageView(context);
imageView.setImageResource(imageIDs[position]);
imageView.setScaleType(ImageView.ScaleType.FIT_XY);
imageView.setLayoutParams(new Gallery.LayoutParams(150, 120));
imageView.setBackgroundResource(itemBackground);
return imageView;
}
}
}
Observe that the DisplayViewsExample class now implements the ViewFactory class. The ViewFactory class creates the views in a ViewSwitcher view. When your class implements the ViewFactory class, you need to override the makeView() method, which creates a new View to be added in a ViewSwitcher.
Press F11 in Eclipse and observe the ImageSwitcher in action as shown in Figure 13.

Android DisplayMetrics
Get screen resolution using android.util.DisplayMetrics
android.util.DisplayMetrics is a structure describing general information about a display, such as its size, density, and font scaling.
To use android.util.DisplayMetrics to get resolution:
Create a dummy Android Application, add a TextView in main.xml to display the result.
<TextView
android:id="@+id/strScreenSize"
android:layout_width="fill_parent"
android:layout_height="wrap_content"
android:text=""
/>
Modify the .java file to read DisplayMetrics
package com.exercise.AndroidScreen;
import android.app.Activity;
import android.os.Bundle;
import android.util.DisplayMetrics;
import android.widget.TextView;
public class AndroidScreenActivity extends Activity {
/** Called when the activity is first created. */
@Override
public void onCreate(Bundle savedInstanceState) {
super.onCreate(savedInstanceState);
setContentView(R.layout.main);
DisplayMetrics dm = new DisplayMetrics();
getWindowManager().getDefaultDisplay().getMetrics(dm);
String str_ScreenSize = "The Android Screen is: "
+ dm.widthPixels
+ " x "
+ dm.heightPixels;
TextView mScreenSize = (TextView) findViewById(R.id.strScreenSize);
mScreenSize.setText(str_ScreenSize);
}
}

Thursday, August 16, 2012
Install Android APK Programmatically
To install app programmatically use following code, you'll need user permissions though.
Intent promptInstall = new Intent(Intent.ACTION_VIEW)
.setData(Uri.parse("file:///path/to/your.apk"))
.setType("application/vnd.android.package-archive";
startActivity(promptInstall);
Subscribe to:
Posts (Atom)